
Hole #1 ~ Home On The Range
Par 4
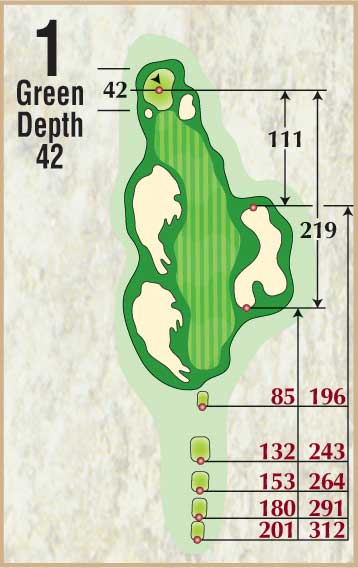
The concept of the easy opening hole was abandoned at Angels Crossing in favor of the wake up call. The first serves to give the player all the information needed for the rest of the round. Features are significant, bunkers are penal, and the player must keep the hole in front of them. The best target for the tee shot is to play a slight draw from the target line starting at the eleventh green. Eight foot deep waste areas border the large landing area, one along the right side and two large buffalo shaped depressions on the left side. The Eden inspired green is elevated with little backdrop making depth perception and club selection important for the approach. Deep bunkers guard the front of the green, a small Strath like bunker on the left and a large crater to the front right. From the green, twelve of the eighteen holes can be seen, giving players a nice preview of what is awaiting them.
The concept of the easy opening hole was abandoned at Angels Crossing in favor of the wake up call. The first serves to give the player all the information needed for the rest of the round. Features are significant, bunkers are penal, and the player must keep the hole in front of them. The best target for the tee shot is to play a slight draw from the target line starting at the eleventh green. Eight foot deep waste areas border the large landing area, one along the right side and two large buffalo shaped depressions on the left side. The Eden inspired green is elevated with little backdrop making depth perception and club selection important for the approach. Deep bunkers guard the front of the green, a small Strath like bunker on the left and a large crater to the front right. From the green, twelve of the eighteen holes can be seen, giving players a nice preview of what is awaiting them.
Hole #2 ~ Lonesome Valley
Par 4
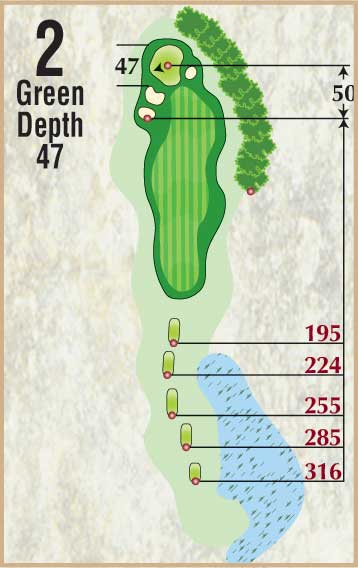
The tee shot is slightly downhill into a hardwood forest, which encloses the secondhalf of the hole. This short par-4 tempts many to pull out the big lumber but a spine runs through the middle of the fairway in the driver landing zone that will kick all but the most perfect shots toward the bunkers. Smart players will hit a tee shot that leaves a full low iron into the green. The green has a small ridge that runs from the right side extending two thirds of the green width. This is a good hole to check the pin position before teeing off to open up angles and minimize the impact of the ridge..
The tee shot is slightly downhill into a hardwood forest, which encloses the secondhalf of the hole. This short par-4 tempts many to pull out the big lumber but a spine runs through the middle of the fairway in the driver landing zone that will kick all but the most perfect shots toward the bunkers. Smart players will hit a tee shot that leaves a full low iron into the green. The green has a small ridge that runs from the right side extending two thirds of the green width. This is a good hole to check the pin position before teeing off to open up angles and minimize the impact of the ridge..
Hole #3 ~ All in the Family
Par 3
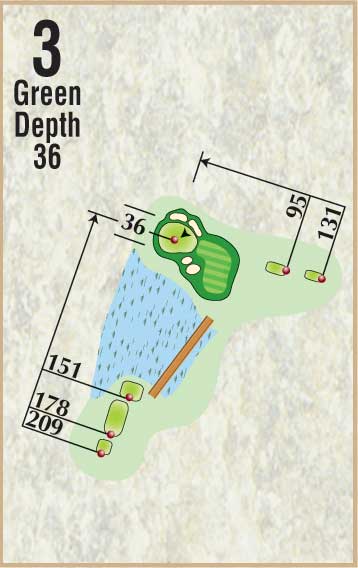
The first par three on the course is pretty dramatic. This two angled beauty really gets the first time player due to yet another ridge which runs diagonally across the green hiding half of the putting surface from each set of tees. For the back three tee players the tee shot over wetlands to a green on the hill has plenty of bail out on the right side. Short, left and long slopes downhill quickly into trouble.
The first par three on the course is pretty dramatic. This two angled beauty really gets the first time player due to yet another ridge which runs diagonally across the green hiding half of the putting surface from each set of tees. For the back three tee players the tee shot over wetlands to a green on the hill has plenty of bail out on the right side. Short, left and long slopes downhill quickly into trouble.
Hole #4 ~ Box Lunch
Par 5
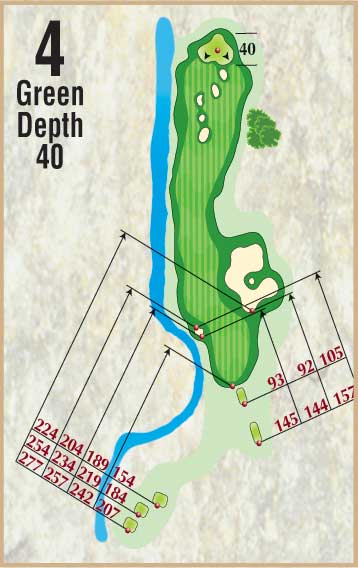
The “Long” of St. Andrews’s fourteenth hole is the forefather of this hole. The cape style “bite off” on the tee shot and the series of five bunkers that split the fairway short of the green provide several different routes to the hole. The first decision a player has to make is whether to go right or left of the principal’s nose bunker, shown on the drawing as a pot bunker but changed in the field during contruction. A tee shot straight over the bunker will find the player in the waste bunker on the far side of the fairway. The second shot will require a bit of thinking and the pin location will drive the day as landing areas and approach angles become crucial into the heavily contoured green. Do not be on the wrong side of the green for your approach and floggers will hope they miss hit the ball when they see the bunkers which protect the center line approach to the green.
The “Long” of St. Andrews’s fourteenth hole is the forefather of this hole. The cape style “bite off” on the tee shot and the series of five bunkers that split the fairway short of the green provide several different routes to the hole. The first decision a player has to make is whether to go right or left of the principal’s nose bunker, shown on the drawing as a pot bunker but changed in the field during contruction. A tee shot straight over the bunker will find the player in the waste bunker on the far side of the fairway. The second shot will require a bit of thinking and the pin location will drive the day as landing areas and approach angles become crucial into the heavily contoured green. Do not be on the wrong side of the green for your approach and floggers will hope they miss hit the ball when they see the bunkers which protect the center line approach to the green.
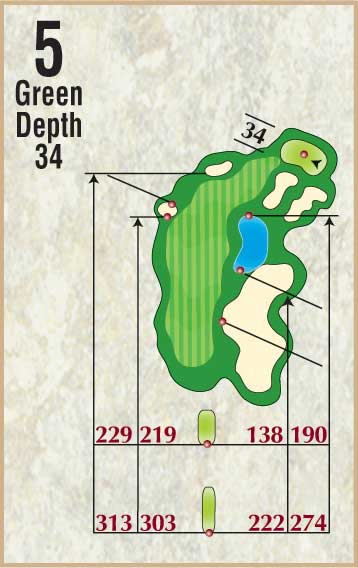
Hole #5 ~ Shepard’s Crook
Par 4
The dogleg right plays around the deep natural area and pond. The entire left side of the hole is tree lined and the longer the tee shot the more this tiered green opens up to the approach. Ironically this short par four may require the best drive of the day due to the angle of the tier. The shallow two-tier green is behind two massive coffinesque bunkers guarding the right half of the green coming in at well over six foot in depth.
The dogleg right plays around the deep natural area and pond. The entire left side of the hole is tree lined and the longer the tee shot the more this tiered green opens up to the approach. Ironically this short par four may require the best drive of the day due to the angle of the tier. The shallow two-tier green is behind two massive coffinesque bunkers guarding the right half of the green coming in at well over six foot in depth.
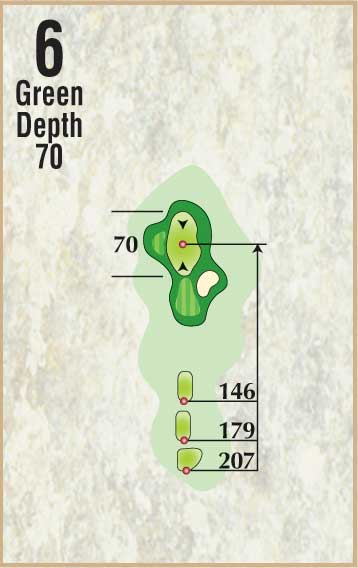
Hole #6 ~ Chasm
Par 3
Willie and Tom Dunn’s third hole “Chasm” at Golf De Biarritz, France that opened in 1888, inspired what has become commonly known as a “Biarritz” hole. C.B. Macdonald’s ninth hole at Yale University is the most famous Biarritz hole. A nine-foot deep bunker guards the right side of the 180-foot long – 15,000 square foot green. Those that find it will have one of the toughest recovery shots found on the course. The center third of the green, which occupies some 4,500 square feet, is four plus feet lower than the front and the rear. Due to some irregular contouring the front is a very difficult pin location which is very deceptive in its breaks. The center alley provides the backdrop for this great optical illusion. As for tips, you are on your own; methods of play here are as varied as the golf swing itself. This hole design is a great test.
Willie and Tom Dunn’s third hole “Chasm” at Golf De Biarritz, France that opened in 1888, inspired what has become commonly known as a “Biarritz” hole. C.B. Macdonald’s ninth hole at Yale University is the most famous Biarritz hole. A nine-foot deep bunker guards the right side of the 180-foot long – 15,000 square foot green. Those that find it will have one of the toughest recovery shots found on the course. The center third of the green, which occupies some 4,500 square feet, is four plus feet lower than the front and the rear. Due to some irregular contouring the front is a very difficult pin location which is very deceptive in its breaks. The center alley provides the backdrop for this great optical illusion. As for tips, you are on your own; methods of play here are as varied as the golf swing itself. This hole design is a great test.
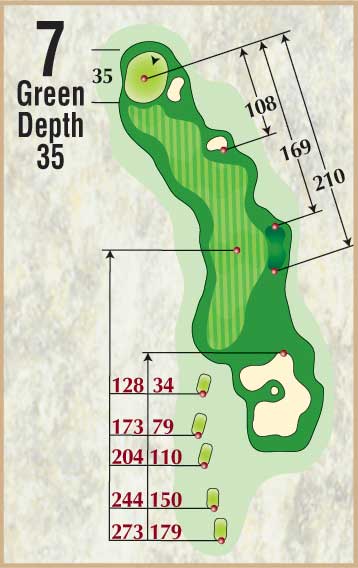
Hole #7 ~ Tradition
Par 4
The long dogleg par four is an off camber alps which plays to a “punch bowl green” nestled among the hardwoods. Cutting the corner off the tree line will only obstruct the player’s view of the green. Macdonalds’s concept of punishing man’s avarice through design is embraced here. Playing to the right side of the fairway and giving up ten to fifteen yard off the tee will give a great view of the green which, depending on pin location may require either aerial or ground attack. The punch bowl, a green that is depressed on three sides, was originally designed by early designers to protect their greens from wind desiccation. The fourth hole at Royal Liverpool Golf Club in England is an early example.
The long dogleg par four is an off camber alps which plays to a “punch bowl green” nestled among the hardwoods. Cutting the corner off the tree line will only obstruct the player’s view of the green. Macdonalds’s concept of punishing man’s avarice through design is embraced here. Playing to the right side of the fairway and giving up ten to fifteen yard off the tee will give a great view of the green which, depending on pin location may require either aerial or ground attack. The punch bowl, a green that is depressed on three sides, was originally designed by early designers to protect their greens from wind desiccation. The fourth hole at Royal Liverpool Golf Club in England is an early example.
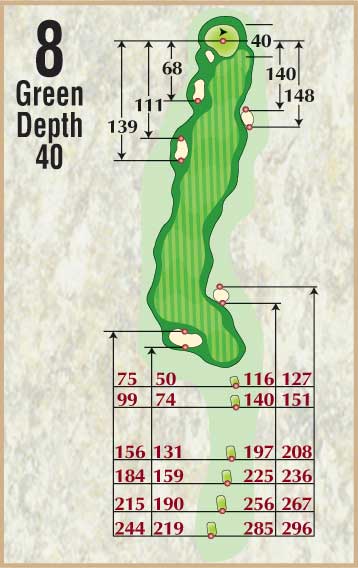
Hole #8 ~ The Hill
Par 5
The perfect uphill tee shot is over the fairway bunker at 230 yards setting up a visible second landing area. The sentry oak on the right side narrows the first landing area telling the golfer, “left is the way.” The hole is tree lined along the right side and a bunker on the left frames the second landing area. The fat part of the small green is over the left greenside bunker. The right side of the Charles Banks style putting surface has a two and a half-foot depression flowing toward the tree line and a very tough front right pin location. The green design is very similar to a drawing in George Bahto’s Evangelist of Golf. The fairway was extended during seeding the encompass the right side of the green and create a false front and collection bowl short right. Since opening two new bunkers have been added to the right side of this hole. The first, a ten foot deep pot bunker, was added to add some risk for those that would try to clear the mound that can be seen just inside the sentry oak. The second was added to discourage attempts to overpower this great three shotter and is visible in the second photo for the hole.
The perfect uphill tee shot is over the fairway bunker at 230 yards setting up a visible second landing area. The sentry oak on the right side narrows the first landing area telling the golfer, “left is the way.” The hole is tree lined along the right side and a bunker on the left frames the second landing area. The fat part of the small green is over the left greenside bunker. The right side of the Charles Banks style putting surface has a two and a half-foot depression flowing toward the tree line and a very tough front right pin location. The green design is very similar to a drawing in George Bahto’s Evangelist of Golf. The fairway was extended during seeding the encompass the right side of the green and create a false front and collection bowl short right. Since opening two new bunkers have been added to the right side of this hole. The first, a ten foot deep pot bunker, was added to add some risk for those that would try to clear the mound that can be seen just inside the sentry oak. The second was added to discourage attempts to overpower this great three shotter and is visible in the second photo for the hole.
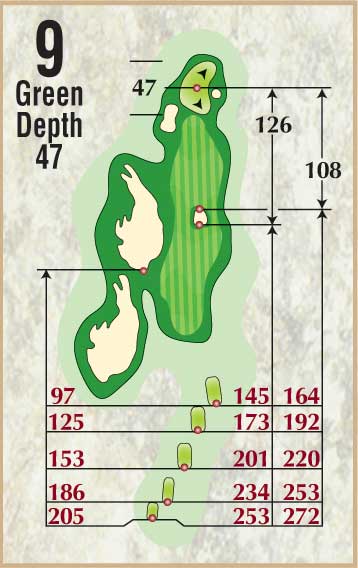
Hole #9 ~ Risk
Par 4
Trees on the right and the buffalo bunker left border the short par four. The small pot bunker, “Scorn”, in the center of the fairway is 240 yards left and DEEP. If a player finds this bunker he may well be hitting SW just to get out, the green will be a consideration for only the best players. Those that can carry the bunker and hit the down slope may well find themselves on the green, but they have to do it with a draw as a fade or straight ball will find its way to a collection area short right of the green. The undulating green complex is open to the run up shot, as the left bunker is not really in play but was used to prevent a players shot from running in front of the first tee.
Trees on the right and the buffalo bunker left border the short par four. The small pot bunker, “Scorn”, in the center of the fairway is 240 yards left and DEEP. If a player finds this bunker he may well be hitting SW just to get out, the green will be a consideration for only the best players. Those that can carry the bunker and hit the down slope may well find themselves on the green, but they have to do it with a draw as a fade or straight ball will find its way to a collection area short right of the green. The undulating green complex is open to the run up shot, as the left bunker is not really in play but was used to prevent a players shot from running in front of the first tee.
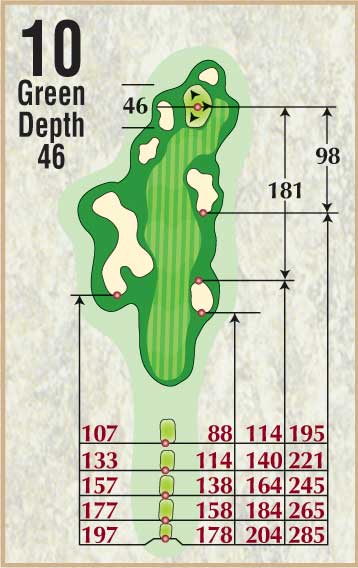
Hole #10 ~ Skyline
Par 4
The medium length, relatively flat dogleg with a green inspired by Royal St. George’s spiny 13th, plays to an elevated trisected green that’s putting surface “floats” on the horizon. Check your pin sheet before teeing off as this hole is a bit counter intuitive, in order to get to a right side pin the tee shot must flirt with the fairway bunker to minimize the impact of the green contours. This is another hole where, after the first playing, the player will know that the dead center of the fairway is just that, dead. The merits of poor visuals and the absence of framing make the golfer trust his or her club selection especially when attacking by air.
The medium length, relatively flat dogleg with a green inspired by Royal St. George’s spiny 13th, plays to an elevated trisected green that’s putting surface “floats” on the horizon. Check your pin sheet before teeing off as this hole is a bit counter intuitive, in order to get to a right side pin the tee shot must flirt with the fairway bunker to minimize the impact of the green contours. This is another hole where, after the first playing, the player will know that the dead center of the fairway is just that, dead. The merits of poor visuals and the absence of framing make the golfer trust his or her club selection especially when attacking by air.
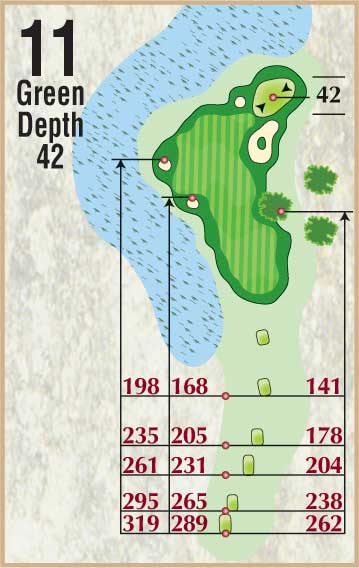
Hole #11 ~ Forget Me Not
Par 4
Since the fourth hole contours have been running wild throughout the greens. Many golfers are now wondering if they will ever see a “regular” green on the course, here it is. The back nine’s short par four is a dogleg right around native prairie grasses and a sentry sugar maple. Wetlands parallel the left side of the hole. Turtle Island, an eight-foot deep “ribbon” bunker short and right of the green challenges the golfer who wants to cut the dogleg. Many putts are under read on this green due to the relative lack of contour.
Since the fourth hole contours have been running wild throughout the greens. Many golfers are now wondering if they will ever see a “regular” green on the course, here it is. The back nine’s short par four is a dogleg right around native prairie grasses and a sentry sugar maple. Wetlands parallel the left side of the hole. Turtle Island, an eight-foot deep “ribbon” bunker short and right of the green challenges the golfer who wants to cut the dogleg. Many putts are under read on this green due to the relative lack of contour.
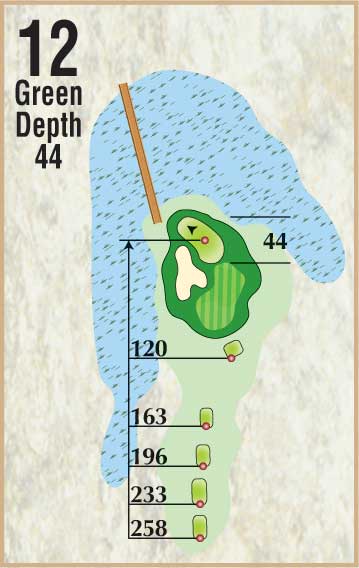
Hole #12 ~ Duke’s Daughter
Par 3
“The Redan.” Inspired by the famous fifteenth hole at North Berwick, Scotland. The long par three is extremely difficult with a green that falls away from tight to left three to four feet. Like the original, the eight-foot deep bunker guards the front 4/5ths of the green, leaving a narrow approach to run the ball up and feed down to the hole. Also in respect to the original, the hole is at grade and the green is not visible from the tee, adding to the challenge.
“The Redan.” Inspired by the famous fifteenth hole at North Berwick, Scotland. The long par three is extremely difficult with a green that falls away from tight to left three to four feet. Like the original, the eight-foot deep bunker guards the front 4/5ths of the green, leaving a narrow approach to run the ball up and feed down to the hole. Also in respect to the original, the hole is at grade and the green is not visible from the tee, adding to the challenge.
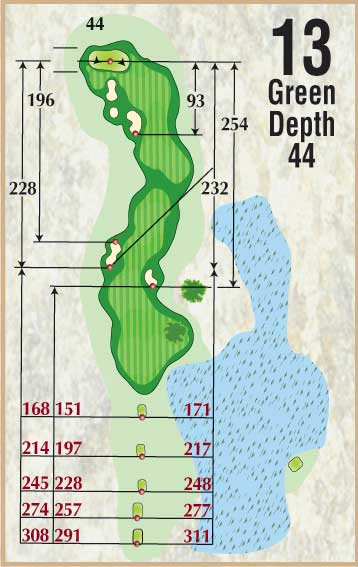
Hole #13 ~ Ole Yeller
Par 5
The double dogleg features a bottleneck first landing area as the bunkers on the right at 270 yards and 290 yards pinch the far end of the landing area. The second landing area plays around the “Cardinal” bunker. The alternative second shot is an aggressive play over the rough inside the dogleg and greenside bunkers. The green is ground game gem that will punish and aggressive shot not coming from the right side of the fairway’s second landing area. Old Tom Morris and Charles Hunter designed the earliest cardinal hole, #3 at Prestwick Golf Club, Scotland.
The double dogleg features a bottleneck first landing area as the bunkers on the right at 270 yards and 290 yards pinch the far end of the landing area. The second landing area plays around the “Cardinal” bunker. The alternative second shot is an aggressive play over the rough inside the dogleg and greenside bunkers. The green is ground game gem that will punish and aggressive shot not coming from the right side of the fairway’s second landing area. Old Tom Morris and Charles Hunter designed the earliest cardinal hole, #3 at Prestwick Golf Club, Scotland.
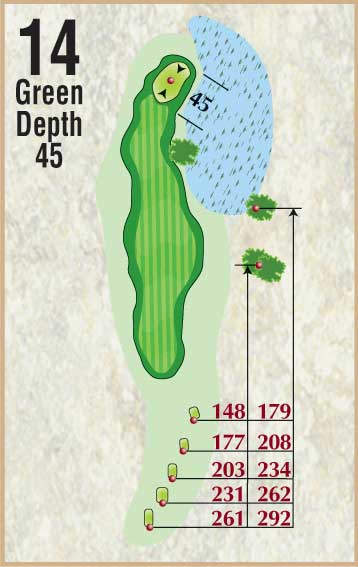
Hole #14 ~ Foonman’s Field
Par 4
Named for the legendary Bernard J. Foonman, this hole is the favorite of many of the better players of the club. The tee shot demands a shot that can find its way to the left half of the fairway while dealing with a landing area that kicks everything to the right. A single oak one hundred yards out from the green and wetlands right guard the right side approach. There are no bunkers on this hog backed hole; none needed, as the green falls away in dramatic fashion.
Named for the legendary Bernard J. Foonman, this hole is the favorite of many of the better players of the club. The tee shot demands a shot that can find its way to the left half of the fairway while dealing with a landing area that kicks everything to the right. A single oak one hundred yards out from the green and wetlands right guard the right side approach. There are no bunkers on this hog backed hole; none needed, as the green falls away in dramatic fashion.
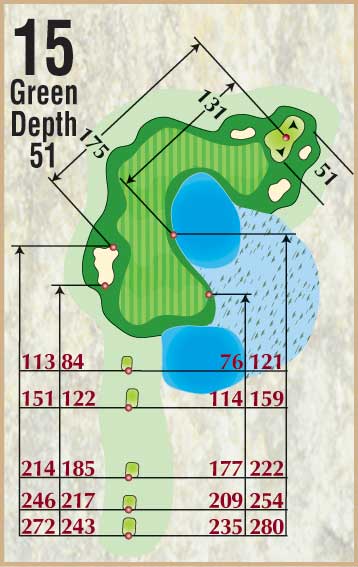
Hole #15 ~ Hickory
Par 4
The dogleg right plays to a wide landing area that offers a shorter, straighter route the further right the tee shot is. But, the landing area is guarded short, right and long by wetlands. The valley emerging from the wetlands into the green is reminiscent of “The Valley of Sin” on the Old Course’s eighteenth hole. The green features a hump in the front left favored by W. Bruce Matthews I during his time with Stiles & VanKleek. The back half of the green goes away and to the left while the front is a mix of old style roll.
The dogleg right plays to a wide landing area that offers a shorter, straighter route the further right the tee shot is. But, the landing area is guarded short, right and long by wetlands. The valley emerging from the wetlands into the green is reminiscent of “The Valley of Sin” on the Old Course’s eighteenth hole. The green features a hump in the front left favored by W. Bruce Matthews I during his time with Stiles & VanKleek. The back half of the green goes away and to the left while the front is a mix of old style roll.
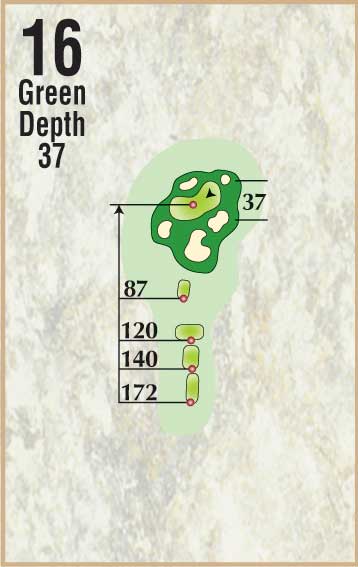
Hole #16 ~ Point Blank
Par 3
The course’s shortest hole is inspired by Mackenzie and Hunter’s sixteenth hole at Cypress Point. The small green is surrounded by fie bunkers testing the short iron approach. The changing winds above the trees increase the importance of club selection. A high soft fade is a must to hold this green. The long view past the green is Barton Lake.
The course’s shortest hole is inspired by Mackenzie and Hunter’s sixteenth hole at Cypress Point. The small green is surrounded by fie bunkers testing the short iron approach. The changing winds above the trees increase the importance of club selection. A high soft fade is a must to hold this green. The long view past the green is Barton Lake.
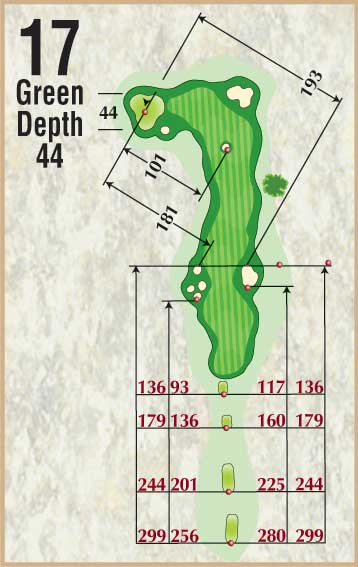
Hole #17 ~ The Natural
Par 5
The very reachable par five is Angels Crossing’s “Cape” hole, which offers a direct route to the green perched twenty feet above wetlands, was the only hole that was found on every routing presented for the golf course. The left side of the fairway is the target for a shot at the green. A bunker complex on the left at 230 yards protects the left side. The second shot to the green is a carry over wetlands or the alternative safer route around the wetlands provides little trouble. C.B. Macdonald’s fourteenth hole at National Golf Links, New York is a preeminent par four Cape hole. Multiple plays are needed to find the secrets to this puzzle which leaves many players scratching their heads after double on the shortest par five of the day. An additional back tee will be added further back and to the west in the coming years making the hole a both a cape tee shot and approach.
The very reachable par five is Angels Crossing’s “Cape” hole, which offers a direct route to the green perched twenty feet above wetlands, was the only hole that was found on every routing presented for the golf course. The left side of the fairway is the target for a shot at the green. A bunker complex on the left at 230 yards protects the left side. The second shot to the green is a carry over wetlands or the alternative safer route around the wetlands provides little trouble. C.B. Macdonald’s fourteenth hole at National Golf Links, New York is a preeminent par four Cape hole. Multiple plays are needed to find the secrets to this puzzle which leaves many players scratching their heads after double on the shortest par five of the day. An additional back tee will be added further back and to the west in the coming years making the hole a both a cape tee shot and approach.
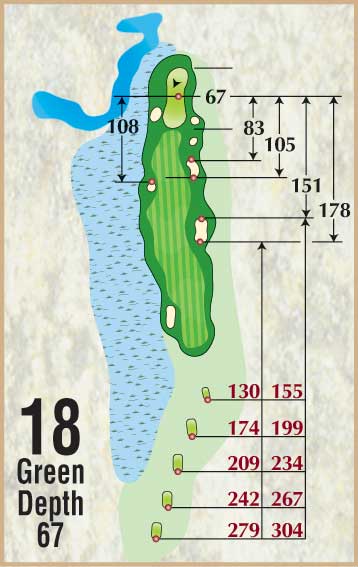
Hole #18 ~ Judgement
Par 4
The finishing hole may be the most difficult on the course. Will you be ready? Flanked on the left by wetlands the entire length, the first landing area is in a bowl directing shots toward the center of the fairway. The long uphill second shot plays to a narrow 210-foot deep green. The wetlands twenty feet below the left side of the green and the bunker on the right demand accurate execution of the approach shot.
The finishing hole may be the most difficult on the course. Will you be ready? Flanked on the left by wetlands the entire length, the first landing area is in a bowl directing shots toward the center of the fairway. The long uphill second shot plays to a narrow 210-foot deep green. The wetlands twenty feet below the left side of the green and the bunker on the right demand accurate execution of the approach shot.